- PolyJet Legacy Printers
- Alaris30 V1
- Connex260
- Connex350/500
- Eden250
- Eden260
- Eden260V/VS
- Eden330
- Eden350
- Eden350V/500V
- J700 & J720 Dental
- J750/J735
- J750 Digital Anatomy
- Objet24/30 V2 Family
- Objet24/30 V3 Family
- Objet30 V5 Pro & Prime
- Objet260 Connex 1-2-3
- Objet260 Dental & Dental Selection
- Objet350/500 Connex 1-2-3
- Objet1000 Plus
- PolyJet Materials
- Agilus30 family
- Biocompatible
- Biocompatible Clear MED610
- Dental Materials
- Dental TrueDent Materials
- Dental TrueDent-D Materials
- Digital ABS Plus
- DraftGrey
- Elastico Clear/Black
- High Temperature
- PolyJet Support
- Rigur & Durus
- Tango
- ToughONE™
- MED610-DSG
- Transparent
- Vero ContactClear
- Vero Family
- Veroflex
- VeroUltra Opaque
- Vivid Colors
- Stereolithography Materials
- Somos® 9120™
- Somos® BioClear™
- Somos® DMX SL™ 100
- Somos® Element™
- Somos® EvoLVe™ 128
- Somos® GP Plus™ 14122
- Somos® Momentum™
- Somos® NeXt™
- Somos® PerFORM™
- Somos® PerFORM Reflect™
- Somos® ProtoGen™ 18420
- Somos® ProtoTherm™ 12120
- Somos® Taurus™
- Somos® WaterClear® Ultra 10122
- Somos® WaterShed® AF
- Somos® WaterShed® Black
- Somos® WaterShed® XC 11122
- Somos® WaterShed® XC+
Managing Multiple Printers
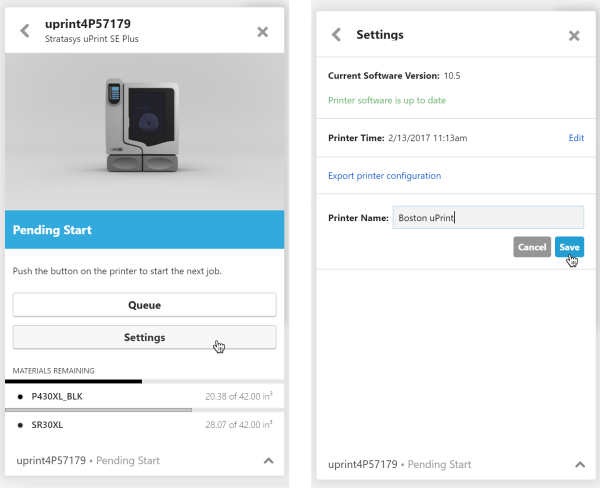
Renaming a printer

If you have many of the same type of printer, giving them custom names can help you distinguish them by something other than the serial number or IP address. This can be especially helpful if you have printers in multiple offices but all your users are on the same company account.
Renaming printers is only available if you are online and connected to a company account. If you are in Offline Mode, you cannot rename printers.
To rename a printer:
- Open the Printer Panel
- Click on the printer
- Click Settings
- Next to Printer Name, click "Edit"
- Type your custom name and click Save

More information about custom printer names:
- Your custom name is saved at the company account level, meaning that as long as you are connected to the company account, you will see the custom name.
- All users on the company account will see the custom name, and it will appear in the mobile app, as well as the schedule and reports online.
- If you switch company accounts, lose your internet connection, or go into Offline Mode, you will no longer see the custom printer name.
Working with multiple printers
What happens when I change printer selection?
All trays in the project will be resized to the build volume of the newly selected printer.
Does this mean my parts will be rearranged?
Parts will only be rearranged if the printer type changes. For instance, if you have two uPrint SE Plus printers, switching between them will not rearrange the parts. But if you have one uPrint SE and one uPrint SE Plus, then switching printers will rearrange the parts. The arrangement is the same as what occurs when clicking "Arrange project" under the Move tool.
To restore the arrangement, you can use Edit > Undo or ctrl+Z. The printer selection will also be undone.
What happens to my material settings, such as slice height?
These apply to specific trays in the project, as well as specific printers. If you change printers, even to one of the same type, your trays will have the default setting for the new printer but will keep your custom settings if you change back to that printer. Your model settings, such as infill style, will be maintained between all printers that support that setting. If you change to a printer which does not support the setting, it will be restored if you switch back.
What is the best way to prepare several trays for simultaneous printing on multiple printers?
Model material settings carry across printer selection, so these can be applied first. Since auto-arrange occurs when changing printer types, you should choose which parts will be on your first tray and hide the remaining parts. That way parts don't move between trays as you change printers. Once you've chosen all your settings for the first print, hit the Print button to queue that job. Then hide those parts and show the parts for your next tray and continue the process for the remaining parts.
