Printers
- PolyJet Legacy Printers
- Alaris30 V1
- Connex260
- Connex350/500
- Eden250
- Eden260
- Eden260V/VS
- Eden330
- Eden350
- Eden350V/500V
- J700 & J720 Dental
- J750/J735
- J750 Digital Anatomy
- Objet24/30 V2 Family
- Objet24/30 V3 Family
- Objet30 V5 Pro & Prime
- Objet260 Connex 1-2-3
- Objet260 Dental & Dental Selection
- Objet350/500 Connex 1-2-3
- Objet1000 Plus
Materials
- PolyJet Materials
- Agilus30 family
- Biocompatible
- Biocompatible Clear MED610
- Dental Materials
- Dental TrueDent Materials
- Dental TrueDent-D Materials
- Digital ABS Plus
- DraftGrey
- Elastico Clear/Black
- High Temperature
- MED610-DSG
- PolyJet Support
- Rigur & Durus
- Tango
- PolyJet ToughONE™
- Transparent
- Vero ContactClear
- Vero Family
- Veroflex
- VeroUltra Opaque
- Vivid Colors
- Stereolithography Materials
- Somos® 9120™
- Somos® BioClear™
- Somos® DMX SL™ 100
- Somos® Element™
- Somos® EvoLVe™ 128
- Somos® GP Plus™ 14122
- Somos® Momentum™
- Somos® NeXt™
- Somos® PerFORM™
- Somos® PerFORM Reflect™
- Somos® ProtoGen™ 18420
- Somos® ProtoTherm™ 12120
- Somos® Taurus™
- Somos® WaterClear® Ultra 10122
- Somos® WaterShed® AF
- Somos® WaterShed® Black
- Somos® WaterShed® XC 11122
- Somos® WaterShed® XC+
3DFashion - Deformations
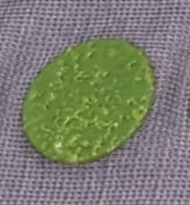
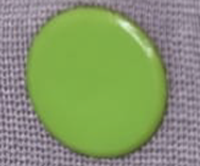
Deformations of 3D Print on Fabric
Sometimes, deformations appear on the top surface of the 3D print. They appear as sunken-in areas or breaks in the 3D print.
Possible Causes and Solutions
Absorption of the Printing Materials into the Fabric
The printing material might be absorbed into the fabric in such a way that it causes deformities.
Solution 1: Print an adhesion layer that is thick enough to compensate for the absorption.
Solution 2: Change the design to compensate for the absorption of the material into the fabric.
Tray Height is Not Calibrated to Match the 3D Print
The accuracy of the tray height calibration (Z-Start) can cause quality issues such as deformities and breaks in the 3D print. This indicates that the Z-Start needs to be recalibrated to correct the tray height.

Solution 1: Recalibrate the tray height (Z-Start).
Solution 2: Increase the adhesion layer thickness.