- PolyJet Legacy Printers
- Alaris30 V1
- Connex260
- Connex350/500
- Eden250
- Eden260
- Eden260V/VS
- Eden330
- Eden350
- Eden350V/500V
- J700 & J720 Dental
- J750/J735
- J750 Digital Anatomy
- Objet24/30 V2 Family
- Objet24/30 V3 Family
- Objet30 V5 Pro & Prime
- Objet260 Connex 1-2-3
- Objet260 Dental & Dental Selection
- Objet350/500 Connex 1-2-3
- Objet1000 Plus
- PolyJet Materials
- Agilus30 family
- Biocompatible
- Biocompatible Clear MED610
- Dental Materials
- Dental TrueDent Materials
- Dental TrueDent-D Materials
- Digital ABS Plus
- DraftGrey
- Elastico Clear/Black
- High Temperature
- MED610-DSG
- PolyJet Support
- Rigur & Durus
- Tango
- PolyJet ToughONE™
- Transparent
- Vero ContactClear
- Vero Family
- Veroflex
- VeroUltra Opaque
- Vivid Colors
- Stereolithography Materials
- Somos® 9120™
- Somos® BioClear™
- Somos® DMX SL™ 100
- Somos® Element™
- Somos® EvoLVe™ 128
- Somos® GP Plus™ 14122
- Somos® Momentum™
- Somos® NeXt™
- Somos® PerFORM™
- Somos® PerFORM Reflect™
- Somos® ProtoGen™ 18420
- Somos® ProtoTherm™ 12120
- Somos® Taurus™
- Somos® WaterClear® Ultra 10122
- Somos® WaterShed® AF
- Somos® WaterShed® Black
- Somos® WaterShed® XC 11122
- Somos® WaterShed® XC+
3DFashion - Wet Marks
Wet Marks Appear Around or Behind 3D Print
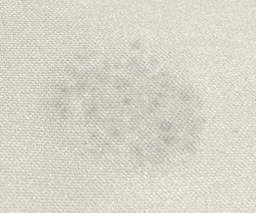
Wet marks appear on the fabric around the 3D print or behind it. This is called wetting effect.
Possible Causes and Solutions
Flex Touch Coating is Applied in Between the Elements
The Flex Touch coating Full option applies a coating layer to the top surface and in between the elements of the 3D print. This increases the contact area between the Flex Touch coating and the fabric surface.
Solution: Apply the coating layer only to the top surface of the 3D print to reduce the contact area by selecting the Flex Touch Smart coating option in GrabCAD Print.
Notes:
- This reduces the wetting that appears around the 3D print, but it does not prevent wetting. The appearance of wetting can be reduced with a thicker fabric.
- If you do not use the Flex Touch coating option, the 3D print may feel sticky when you use flexible printing material.
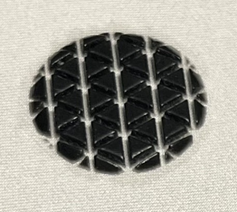
Type of Geometry and Flex Touch Coating
The type of geometry of the 3D print along with using Flex Touch coating can affect the level of wetting on the fabric.
For example, the left image is a 3D print with a fully-segmented geometry, and the right image shows a high level of wetting from the Flex Touch coating on the back of the fabric:
&rev=643c91f2a294488a950c8f6403db88f2)
Solution: Change the geometry to reduce the wetting effect.
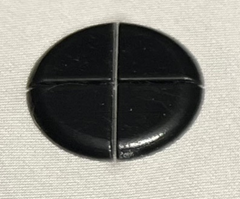
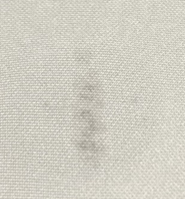
For example, the left image is a 3D print with a partially-segmented geometry, and the right image shows a low level of wetting from the Flex Touch coating on the back of the fabric:
&rev=0762272a758f478d973d93116b3e6d7e)
&rev=2d4f14cf69f04438a83edd82e562196c)
Sparse Geometry
The design has a few elements that are not close together.
Solution: Use a dense geometry design (many elements that are close together).