
Changing Printing Materials
Before producing models using a different type of printing material than is currently installed, run the Material Replacement wizard to flush the print block and feed tubes. The factors that are relevant when changing materials are the print mode, printing material, and the specific printer.
Important:
For J5 DentaJet XL printers, changing the print mode requires running the Shutdown wizard with the More than 30 days option and then performing a system power-up by a service engineer.
To minimize downtime, contact your Stratasys service provider to schedule a service visit.
Do not try to load material without a service engineer as it might adversely affect printer operation.
To ensure the biocompatibility of printed parts when changing from standard printing materials to biocompatible materials, follow the instructions for loading the relevant material. To download the required document, search for "Biocompatibility Requirements" on the Stratasys Support Center.
Important:
For information about print modes, see Print Modes.
All printers, except J5 DentaJet XL
You can change materials according printer and the corresponding print modes:
For information about changing material for J5 DentaJet XL, see J5 DentaJet XLPrinters Only.
| • | High Quality Speed |
This mode enables you to produce 3D prints with 5 model materials. Each print head section is loaded with a different material.

Do not load MED625FLX in the M5 cartridge slot. For information about biocompatible materials, search for "Biocompatibility Requirements" on the Stratasys Support Center.
Tip for printing in High Quality Speed mode:
- This mode is compatible with Digital Anatomy materials. For information about printing quality anatomical models on the J5 Digital Anatomy printers, refer to Printing Advanced Medical Models on J5 - Supplementary User Guide.
| • | High Speed (J55 Pro/Prime and J5 MediJet (for users with GrabCAD Print Pro), and J5 Digital Anatomy). |
With this mode, you can load 2 cartridges of the same model material and 2 cartridges of the same support material.
The print speed is faster than High Quality Speed mode.
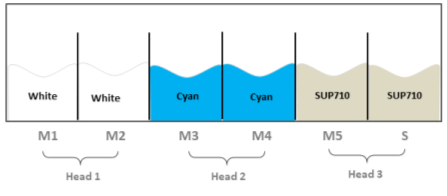
| • | Long Print |
This mode enables you to load more cartridges of a single material thereby significantly reducing the need to replace cartridges during the print job. The cartridges of the material you wish to print without replacing, must be loaded in the channels of the same print head
| • | High Quality High Speed (J5 DentaJet only) |
This mode enables faster printing while maintaining model quality. The loading of the cartridges is the same as the Long Print mode.
Do not load MED625FLX in the M5 cartridge slot. For information about biocompatible materials, search for "Biocompatibility Requirements" on the Stratasys Support Center.
You can change materials according printer and the corresponding print modes:
For information about changing material for all J5 printers except J5 DentaJet XL, see All printers, except J5 DentaJet XL.
| • | Super High Speed (J5 DentaJet XL only) |
This mode enables you to print at a speed about 3 times that of High Quality Speed mode, and has good surface quality.
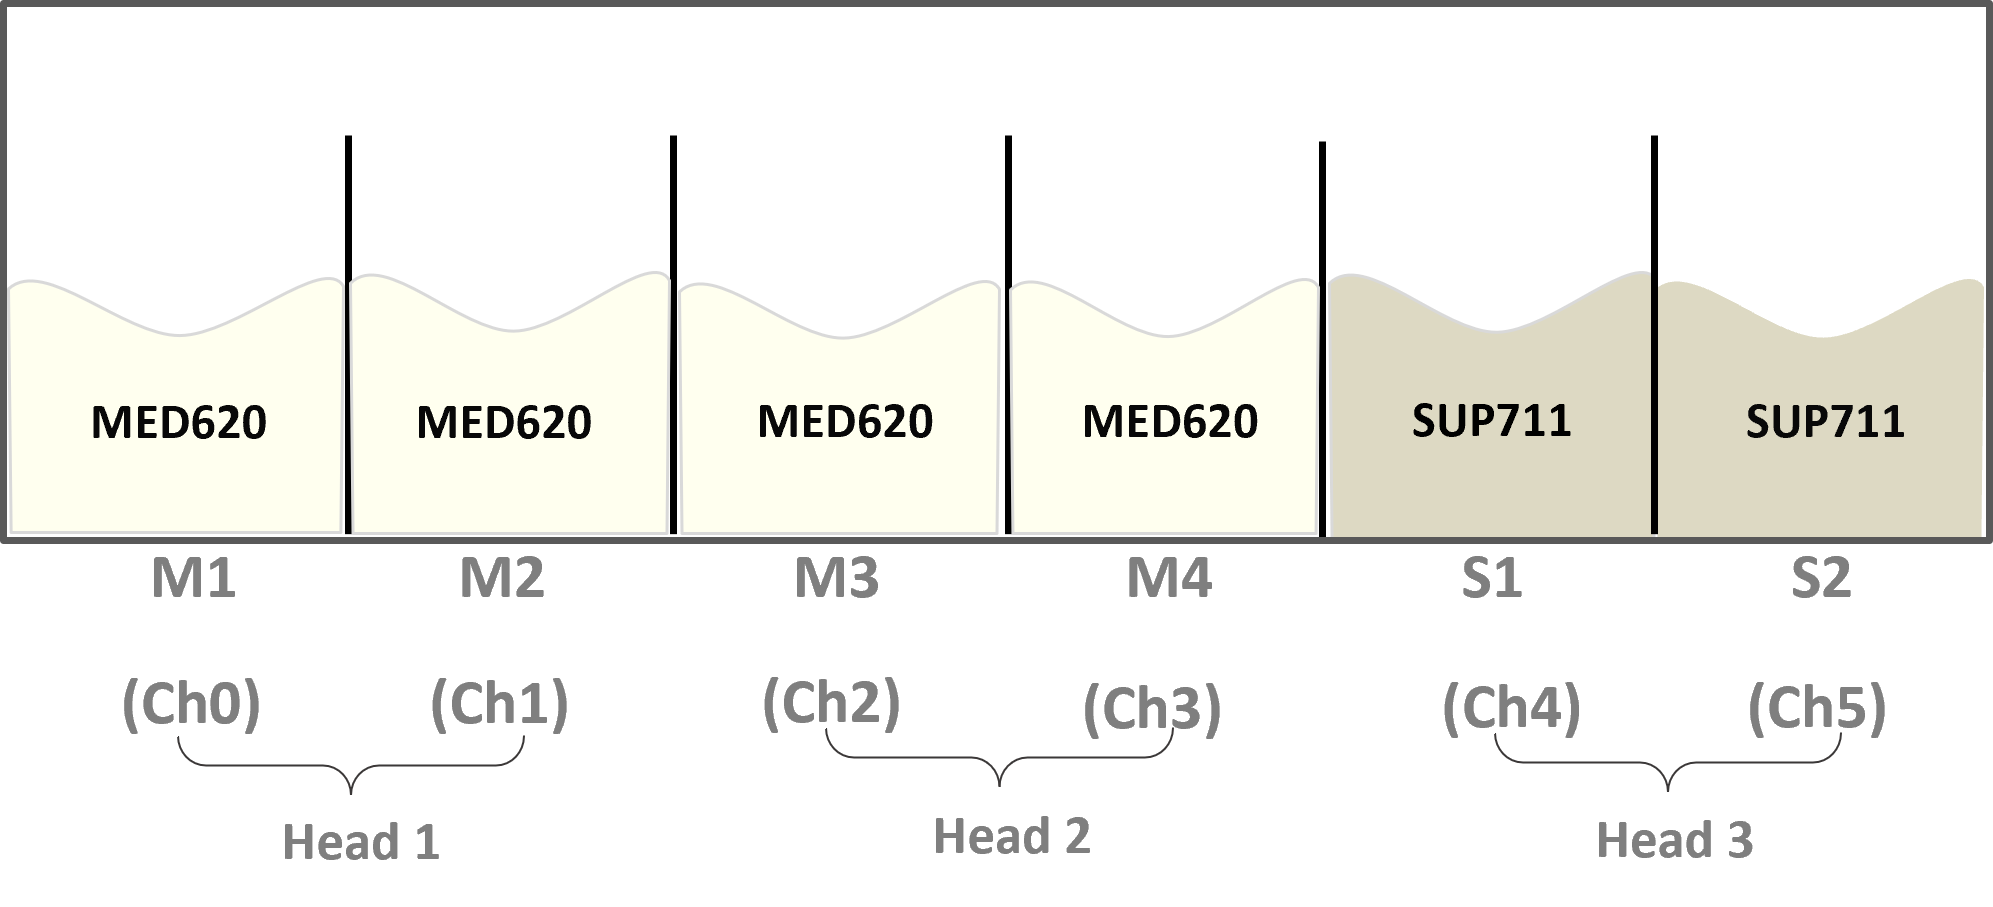
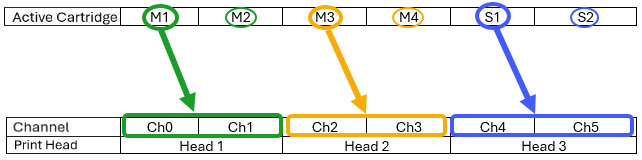
For each material, the printer automatically switches (hotswaps) between the cartridges that supply material to the print heads.
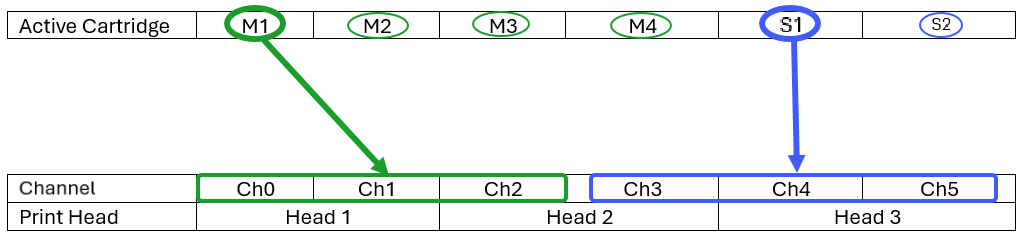
| • | For the model material: A single model cartridge supplies all 3 model channels: Ch0, Ch1, and Ch2. In this case, material cartridge 1 (M1) is active. |
| • | For the support material: A single support cartridge, supplies all 3 support channels: Ch3, Ch4, and Ch5. In this case, support cartridge 1 (S1) is active. |
Tips for Super High Speed mode:
- Use MED620 model material, which is the only approved model material for this mode.
- Use SUP711 support material, and the default grid type is Lite.
- To reduce the cost per model and to achieve optimal results, use a hollowed model with 1.5–2.0 mm wall thickness.
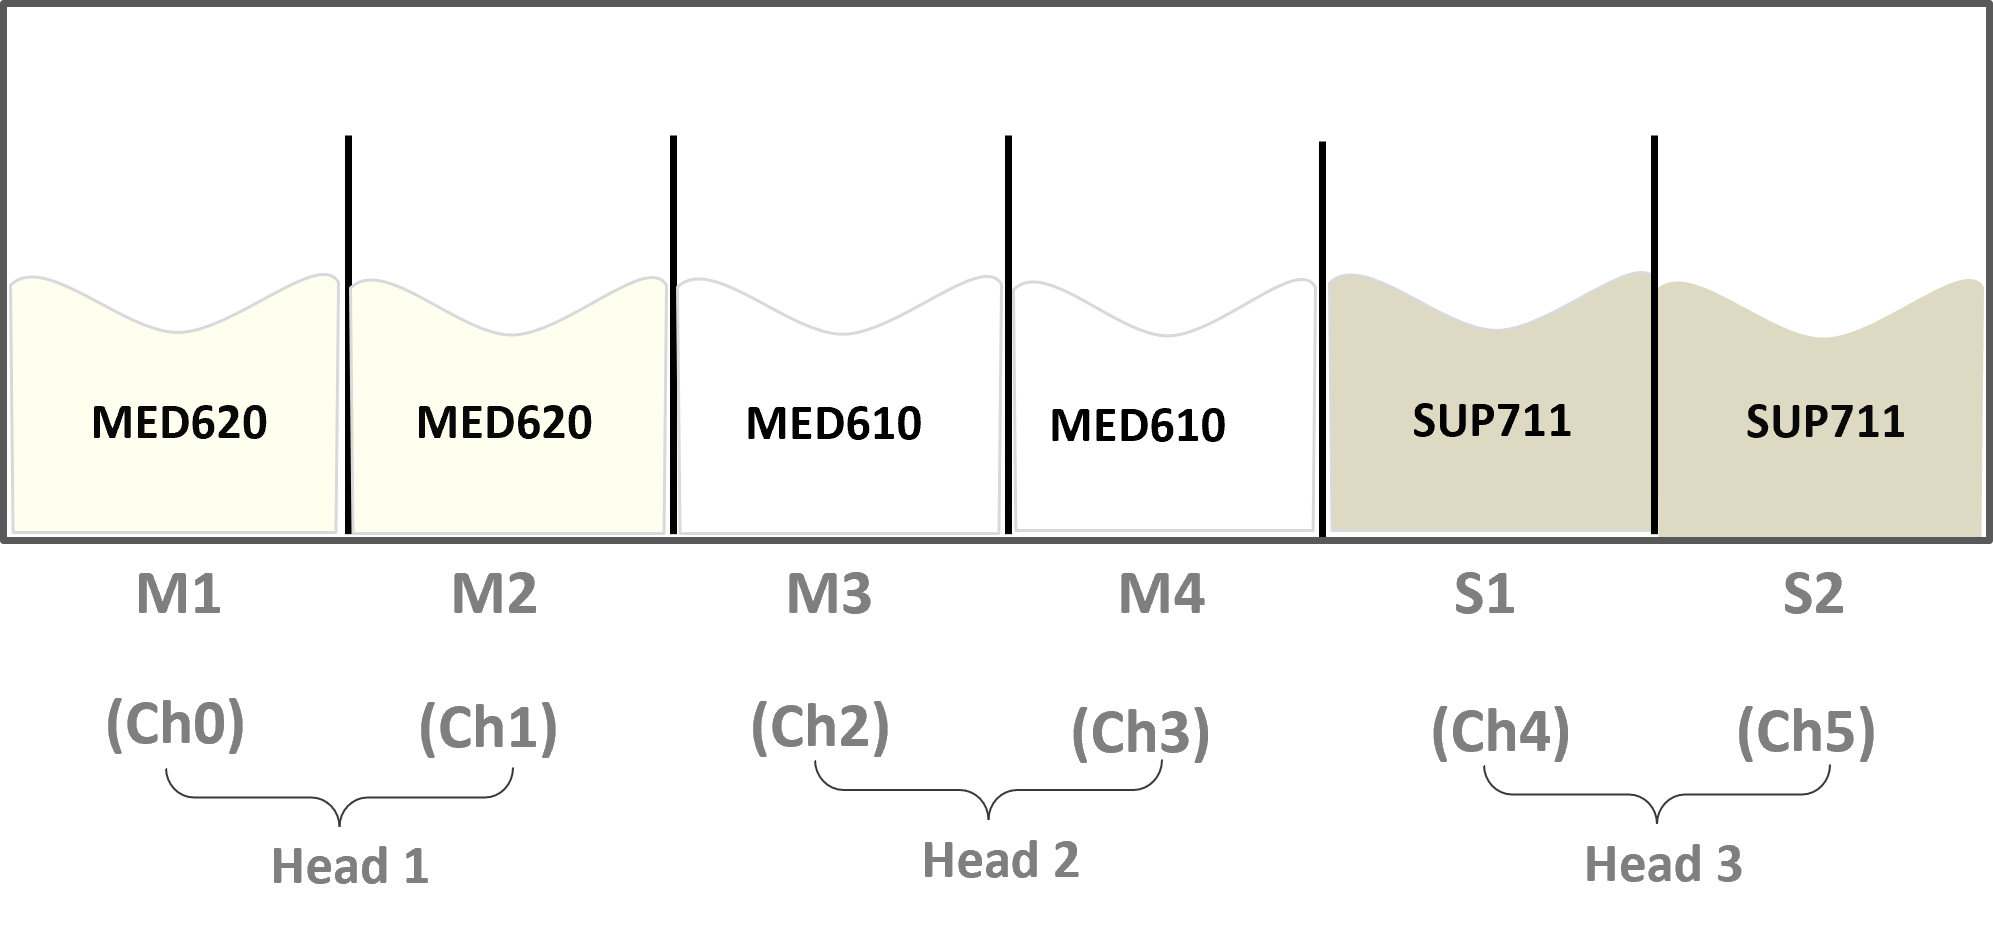
| • | High Quality High Speed (J5 DentaJet XL only) |
This mode enables you to print at a faster speed thanHigh Quality Speed mode and the same surface quality as Super High Speed mode. See .
For each material, the printer automatically switches (hotswaps) between the cartridges that supply material to the print heads.
| • | For Material 1: A single model cartridge supplies both model channels: Ch0 and Ch1. In this case, material cartridge 1 (M1) is active. |
| • | For Material 2: A single model cartridge supplies both model channels: Ch2 and Ch3. In this case, material cartridge 3 (M3) is active. |
| • | For Support Material: A single support cartridge, supplies both support channels: Ch4 and Ch5. In this case, support cartridge 1 (S1) is active. |
To replace the printing materials:
| 1. | From the Wizards screen, tap . |
![]()
| 2. | In the opening screen, tap . |
Note: If you have TrueDent or TrueDent-D materials, select Denture.

Denture selection
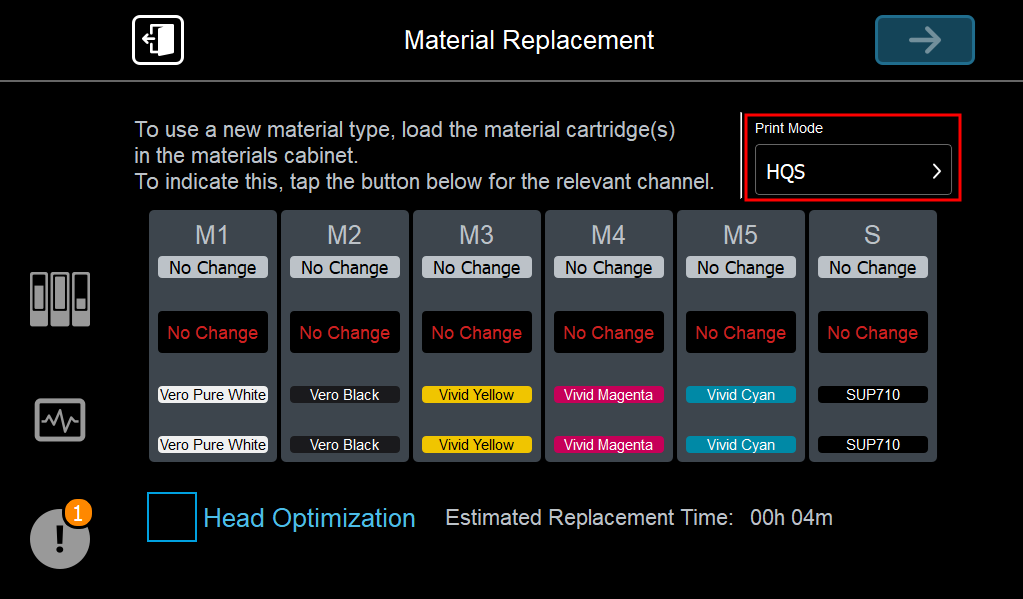
| • | For J5 printers (except J5 DentJet XL), the main material replacement screen shows the materials currently loaded in each of the model cartridge slots (M1–M5) and in the support cartridge slots (S). |
| • | For J5 DentJet XL printers, the main material replacement screen shows the channels to be loaded (Ch0-Ch5). |
| • | For Super High Speed mode: |
Ch0, Ch1, Ch2: Load with the same Model Material (MED620)
Ch3, Ch4, Ch5: Load with Support Material
| • | For High Quality High Speed mode: |
Ch0 – Ch1: Load with Model Material 1
Ch2 – Ch3: Load with Model Material 2
Ch4 – Ch5: Load with Support Material
| 3. | To change the print mode, do the following: |
Important:
- If you have a J5 DentaJet XL printer, and you want to change the print mode, contact your Stratasys service provider to schedule a service visit to power up the printer. Do not try to load material without a service engineer as it might adversely affect printer operation.
- If you do not need to change the print mode, continue to step 4.
- For more information about print modes, see Print Modes.
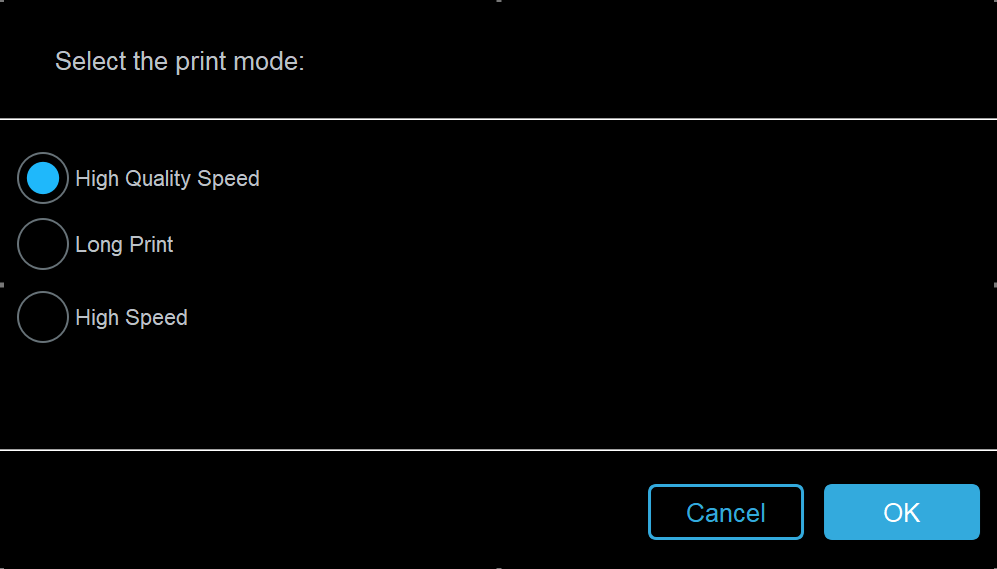
a. In Print Mode, tap .
The print modes appear as the following abbreviations in the main screen:
| • | HQS—High Quality Speed |
| • | LP—Long Print |
| • | HS—High Speed |
| • | HQHS—High Quality High Speed |
| • | SHS—Super High Speed |
b. Select the print mode and tap .
The displayed print modes depend on the printer type.
Important:
For information about print modes, see Print Modes.
| 4. | To change the material: |
| • | For all J5 printers (except J5 DentaJet XL), load 2 cartridges of the new material into the material cabinet for the selected cartridge slot. |
| • | For J5 DentaJet XL printers, load cartridges of the new material into the material cabinet, as follows: |
| • | For Super High Speed mode: |
Ch0, Ch1, Ch2: Load with the same Model Material (MED620)
Ch3, Ch4, Ch5: Load with Support Material
| • | For High Quality High Speed mode: |
Ch0 – Ch1: Load with Model Material 1
Ch2 – Ch3: Load with Model Material 2
Ch4 – Ch5: Load with Support Material
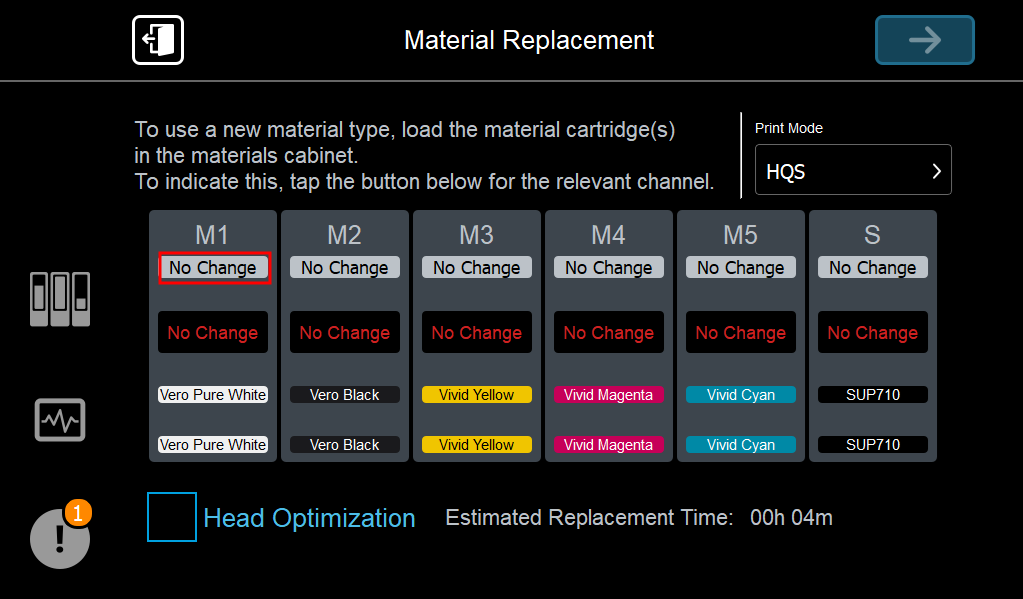
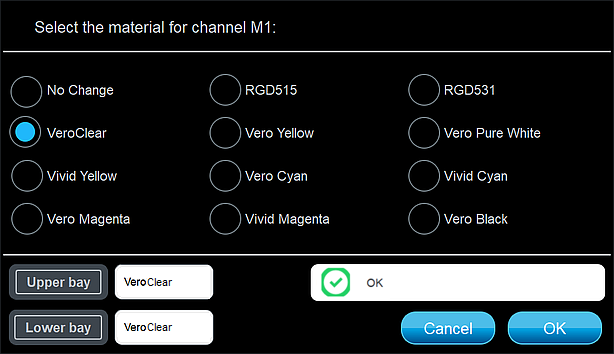
| 5. | In the wizard screen, for the relevant cartridge slot, tap for that cartridge slot. |
| 6. | In the material selection screen for the selected cartridge, verify that the material cartridges you loaded in the materials cabinet appear at the bottom of the screen. |
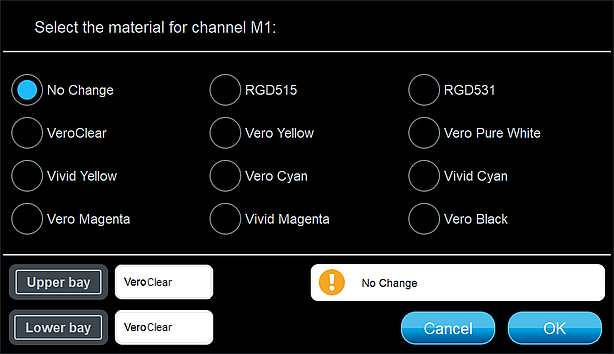
| 7. | Select the new material. |
indicates that there is enough material loaded in the  appears in the cartridge status message box, resolve the issue, if relevant.
| • | indicates that no material has been selected. If you do not need to change the material, no action is necessary. |
| • | indicates that the selected material is different than the currently loaded cartridge. Load the selected material or select another material. |
| • | indicates that the material is selected for more channels than allowed by the selected print mode. Select a different material in one of the slots. |
| • | indicates that there is not enough material loaded in the slot. Load a cartridge in the slot. |
For more information about cartridge statuses, see Cartridge Statuses
| 8. | Tap . |
| 9. | In the main material replacement screen, verify that the new material appears in the cartridge slot. |
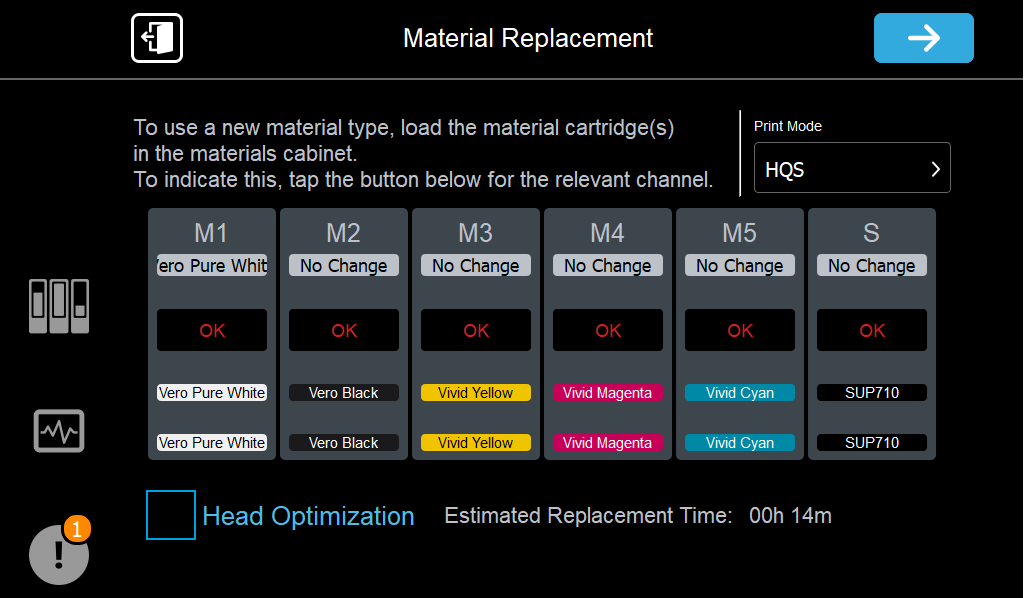
Replacing certain materials requires print-head optimization. If this is the case, Head Optimization is selected automatically in the Material Replacement screen.

Note: If Head Optimization is selected, run the Advanced Head Optimization wizard after completing the Material Replacement wizard, before printing.
| 10. | Replace materials in all of the required cartridge slots and then note the estimated replacement time. |
| 11. | Tap . |
If you continue, you must complete the material replacement process before you can print models. To replace material cartridges at another time, tap Cancel. If you continue (by tapping Next) and you do not complete the process, you will need to run the wizard again before printing.
| 12. | After tapping , follow the instructions in the wizard screens. |
To complete the material replacement process:
- When replacing printing materials (Model and Support) with other printing materials, the printer prints a model in the shape of an arc.
- When replacing printing materials with cleaning fluid, the printer purges.