- PolyJet Legacy Printers
- Alaris30 V1
- Connex260
- Connex350/500
- Eden250
- Eden260
- Eden260V/VS
- Eden330
- Eden350
- Eden350V/500V
- J700 & J720 Dental
- J750/J735
- J750 Digital Anatomy
- Objet24/30 V2 Family
- Objet24/30 V3 Family
- Objet30 V5 Pro & Prime
- Objet260 Connex 1-2-3
- Objet260 Dental & Dental Selection
- Objet350/500 Connex 1-2-3
- Objet1000 Plus
- Stereolithography Materials
- Somos® 9120™
- Somos® BioClear™
- Somos® DMX SL™ 100
- Somos® Element™
- Somos® EvoLVe™ 128
- Somos® GP Plus™ 14122
- Somos® Momentum™
- Somos® NeXt™
- Somos® PerFORM™
- Somos® PerFORM Reflect™
- Somos® ProtoGen™ 18420
- Somos® ProtoTherm™ 12120
- Somos® Taurus™
- Somos® WaterClear® Ultra 10122
- Somos® WaterShed® AF
- Somos® WaterShed® Black
- Somos® WaterShed® XC 11122
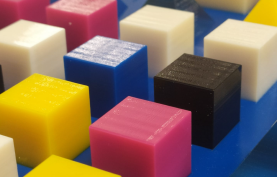
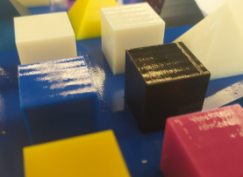
Waviness
The top surface of the part is wavy instead of flat.

The surface waviness could be mild or severe, as shown in the images above and below.
Possible Causes and Solutions
UV intensity is too high
High UV intensity may adversely affect the model quality.
Solution 1: Run the UV Lamp Calibration wizard to adjust the UV intensity level. If the UV lamp cannot be calibrated, you might need to replace the UV lamp. See the user guide for guidelines.
Preventive measures: In the printer application, a pop-up message reminds you to test the lamps and calibrate the level of UV intensity after every 300 hours of printing. See the user guide for details.
Solution 2: In GrabCAD Print, enable only 1 UV lamp.
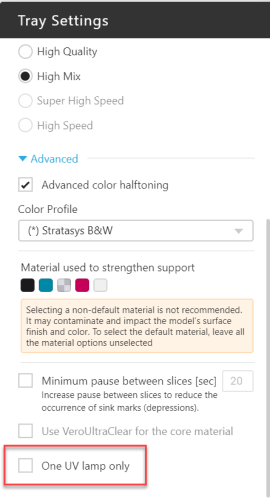
Note: The option to change the UV lamp activation is available per job. In your next print job, you can enable both UV lamps, if necessary.
Clogged Nozzles:
Sometimes nozzles can get partially or completely blocked, particularly if routine maintenance was not done on a regular basis. This can result in depressions, grooves, and poor surface quality.
To determine if this is the cause, you can run the Pattern test. The Pattern test demonstrates the condition of all the nozzles in the print heads, and it is the basic verification of the printer’s ability to produce quality models. If nozzles are clogged, you will see missing stripes during this test. In any case, you can also always run the Dynamic Nozzle Test as a diagnostic tool if you suspect the nozzles are not working properly.
- Note that each column has a tolerance of up to 10 consecutive nozzles before it can be considered a failed test.
Solution: If the Pattern test passes, move on to the next possible cause. If the Pattern test fails, run the Head Optimization Wizard. The wizard will indicate which heads, if any, need replacement. You can read the full guidelines for replacing print heads in the user guide
Preventive measures: To maintain the nozzles and prevent this issue from happening, clean the heads after every print job while print heads are still warm (~45 degrees Celsius). Also follow our other preventative maintenance best practices, such as regular inspection and cleaning of the orifice plates, cleaning the roller and wiper, and running the wizard. Refer to your user guide for details.
Clogged Roller Waste Collector:
The roller waste collector might be clogged, therefore, not properly removing the material from the roller. If the roller is not clean, surface quality can be affected.
Solution: Clean the roller waste collector. See user guide for instructions. If you are using one of our desktop printers, replace the roller waste collector assembly.
Dulled or Misaligned Roller Scraper:
The roller scraper may be dull or misaligned, and therefore not properly removing excess material from the roller. If the roller is not clean, surface quality can be affected.
Solution: Replace the roller scraper. See user guide for instructions.
Preventive measures: Replace the roller scraper blade after 1,000 hours of printing or if it does not effectively keep the roller clean, whichever comes first. Also, periodically test the effectiveness of the roller scraper when you clean the roller waste collector.
External ventilation system is not working properly:
If ventilation system is not working properly, the temperature in the room can exceed the specifications and this can affect part quality.
Solution 1: If the printer exhaust is connected to an external ventilation system, the odor filter is not needed and should be removed from the printer. This improves system cooling.
Solution 2: Make sure that the ventilation system is connect properly to the air duct at the back of the printer.
Solution 3: Make sure that the ventilation system is connected properly ventilation duct that expels the air outdoors.
Solution 4: Make sure that the area where the air is expelled outdoors in not blocked.
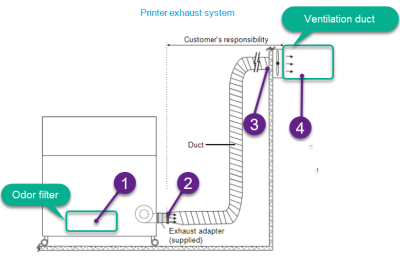
Solution 5: Check that the temperature in the room and make sure it meets the specification.
Solution 6: Check that the suction from the exhaust adapter meets the specification.
Refer to the See the Site Preparation Guide for more details.
Part Orientation:
Orientation of the part on the tray can affect surface quality.
Solution: Change the orientation of the part along the Z axis by 45 degrees and print again.