Model-Material Settings
Before placing objects on the build tray in Objet Studio, you should pay attention to the material selection settings on the Tray Settings ribbon.
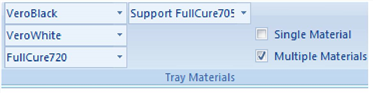
Material selection settings
|
•
|
By default, the material selection settings on the ribbon correspond to the three Model cartridges loaded in the printer. |
|
•
|
The materials displayed are basic model materials.
With Connex2 and Connex3 printers, these materials can be combined to create digital materials (see Digital Materials).
|
|
•
|
The material displayed on the top (VeroBlack, in the figure above) is considered the primary model material (“Model-1”). It is assigned to objects that do not have a material assignment when you place them on the build tray. For example, since stl files do not contain information about the model material, Objet Studio assigns the primary model material to them. Also, if you try to insert objdf files whose assigned materials are not recognized by your version of Objet Studio, you can insert the file by substituting the primary model material for the missing materials. |
|
•
|
Select Single Material if you want to print using only one material—all of the material drop-down menus contain the same material. If you decide to print with multiple materials, the material in the top drop-down menu remains assigned to the object until you select another material. |
|
•
|
If you insert an objdf file into an empty build tray, and the model-material assignment does not match the settings on the Tray Settings ribbon, these settings are changed automatically. However, if there is an object already on the build tray whose materials do not match the material assignment in the objdf file, you cannot place the new object on the tray. To print this object, you have the following options: |
|
❒
|
Instead of printing it on the same build tray, print the new object as a separate job. |
|
❒
|
Change the materials assigned to the new object before inserting it, so there is no conflict with the settings on the Tray Settings ribbon. |
To change the materials assigned to an object before inserting it:
|
1.
|
Open another Objet Studio window, by running the application from the Windows Start menu. |
|
2.
|
Insert the new object (objdf file) into the empty build tray. |
|
3.
|
Change the material selection settings on the Tray Settings ribbon to those used on the other build tray. |
|
5.
|
Select the object and copy it. |
|
6.
|
Display the other Objet Studio window, and paste the object onto the build tray. |
Note: You can save the object with the new materials either as a new objdf file, or by saving the original file with the changes.
